Adjustment layers are a powerful way to make non-destructive edits like changing color or tonal values in an image or to a portion of an image.
- I’m going to start by adding a hue saturation adjustment layer. I can do that by either selecting the Layer > New Adjustment Layer menu and then choosing Hue/Saturation. We can also click on the adjustment layer icon at the bottom of the Layers panel and select Hue/saturation.
- When you add an adjustment layer, the options for that adjustment layer are automatically displayed in the properties panel. Also an adjustment layer is created in the Layers panel.
- Some adjustment layers have presets that you can explore. I could use the fly out menu and then choose to save a preset.
- We can also change the blend mode as well as the opacity for the adjustment layer.
- Each adjustment layer has its own adjustment layer mask. So if I tap the B key to select the brush tool, I can select a large brush and then if I paint with black in the image area, I can hide the adjustment in that area.
Adjusting color using Level
- I will open the Histogram panel. If your histogram panel isn’t showing, you can find it under the Window menu.
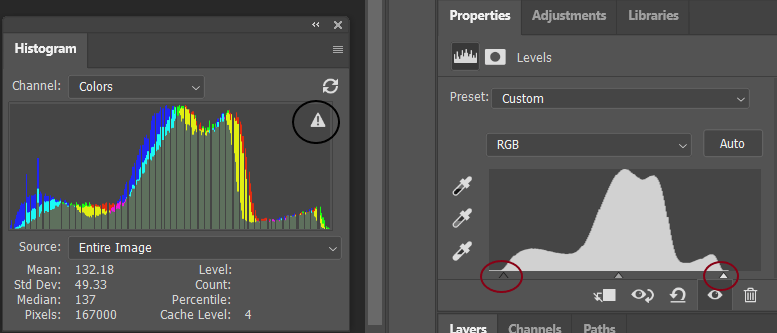
- I am going to add a Levels adjustment layer from the bottom of the Layers panel. From the histogram, I know that the dynamic range of this image is a little bit flat. Because there aren’t values in the pure black area, nor in the highlight or white area here.
- I can click on the Auto button in the properties panel, to let Photoshop adjust the dynamic range.
- If I hold down the option key on Mac or the alt key on Windows, and click on the black point slider (inside red circle in left of the property panel). We can see which areas of the image are being clipped.
- Similarly move white point slider while holding down Alt key, over further and we see these black areas. It means that the colors have been clipped in all three channels. So I have black without detail.
- If I wanted to reset this, we could click on the reset icon in properties panel.
- Triangle icon (inside the black circle) is telling me that the representation of the histogram is created from a cached version. So in order to get live histogram, click on that warning.
- Now, when we make these adjustments to stretch out the dynamic range over the entire histogram, we can see that we’re actually creating gaps in the histogram. But we can see there are gaps in the histogram and that’s because we’re working with an eight bit image. Using 16 bit, gives more information and I’ll have more overhead when I’m making the adjustments.

Adjusting color using Curves
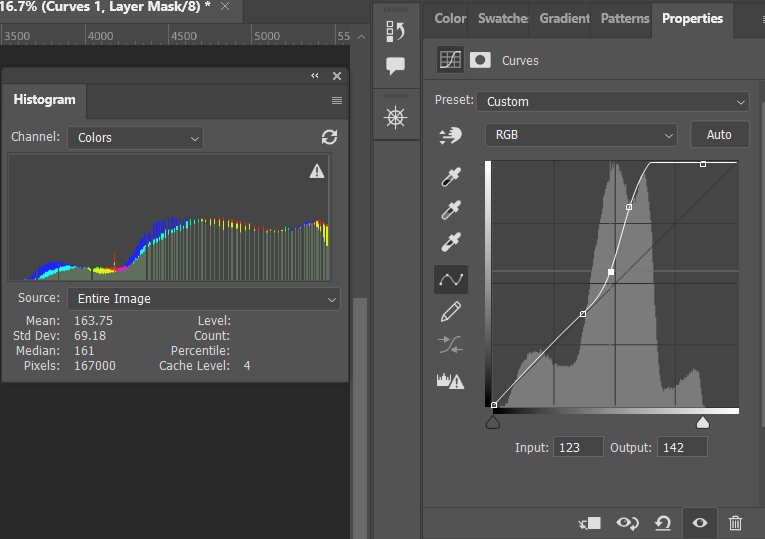
- I am going to add a Curves adjustment layer from the bottom of the Layers panel. Now we see the options for the curves in the properties panel.
- In order to set black and white points in curves, we could also use the Auto option. Alternatively manually drag over black point. Holding down the option key on Mac or the alt key on Windows as I dragged to the right until I see those areas being clipped. I will do same thing for white point.
- I can add up to 16 different points on this curve. And in fact, I can use the onscreen control to click in a value to set down a point on that curve. I can also click and drag in order to darken or lighten that area. So if we ever want to get rid of a point on the curve, we can just drag that off of the curves panel.
- I can also go into the individual red, green, and blue channels in order to change the color. We can use these channels in combination with any of the other red or green channels.
- We can also make tonal and color adjustments to selective areas in the image. I’m going to choose the object selection tool, and then hover my cursor above the object. As soon as the object finder completes, it will automatically enable me to select this by just clicking on it. So with that selected, I’ll add another curves adjustment layer using the icon at the bottom of the layers panel. Now, any adjustments that I make are only going to affect that area that was selected.
- White will show the adjustment and black we’ll hide it. Now I will tap the “x” key to paint with black in order to hide it in this area.

Applying Adjustment Layers to Multiple Layers
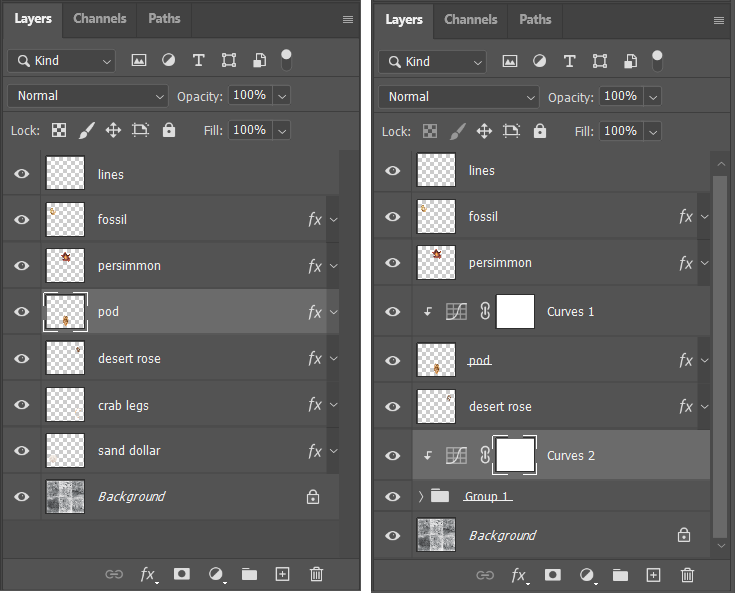
But what if I only want to affect a single layer, say pod layer. So I will target it, and then from the bottom of the layers panel, I’ll add a curves adjustment layer. I’ll go ahead and pull down my shadow areas and push up my highlights in order to create an S curve and add more contrast. But we can see that this layer is affecting all of the layers below it.
To isolate the effects to just the layer
- I am going to the adjustment layer by targeting the desired layer, in this case pod layer.
- I can choose the Layer menu and then select Create Clipping Mask. Or I can position my cursor in between the curves adjustment layer and the pod layer and hold down the Option key on Mac or the Alt key on Windows. And when I see that same icon that’s in the properties panel, I can click to create clipping mask.
- I know that these two layers are in the clipping mask because the bottom layer has an underlying under the name, and the top layer here has the downward pointing triangle.
- If I want to apply an adjustment to say two layers i.e. crab legs as well as the sand dollar. I’ll select that layer and then add another curves adjustment layer. So in order to isolate the curve to just these two layers, I will select them in the layers panel and then either use Command + G on Mac or Control + G on Windows or drag them to the group icon to put them inside of a group.
- Now I will select the curves adjustment layer, hold down the option key or the alt key in order to see that icon to create a clipping mask and then clip the curve adjustment layer so that it only affects the contents of that group.

