In this article we are going to take a look at various blend mode available in Adobe Photoshop. Blend modes can be used with Layers, painting tools and more.

The blend modes are grouped together in the list and they’re separated by thin lines as soon above.
First Group Blend Modes
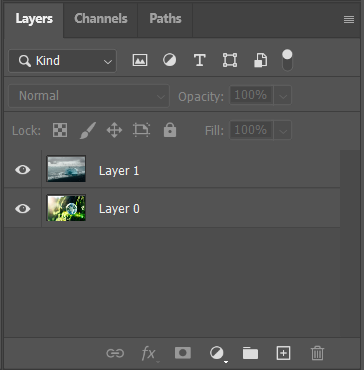
So in this document I have two layers. In the first group, we have Normal and Dissolve.
- In Normal there really isn’t any blending. We can change the opacity of the layer but it’s not technically a blend mode.
- With Dissolve, if I decrease the opacity of the layer, Photoshop starts blending the two layers together. This mode is picking one pixel from one layer or the other layer randomly. So it creates speckled effect where the resulting color is either a color from the base layer (Layer 0) or from the blend layer (Layer 1).
Second Group Blend Modes
Second group of blend modes all have a stronger effect as the blend color becomes darker. And for all the blend modes in this group, the pixels that are white they’re hidden. Multiply blend mode multiplies the base color with the blend color.
Third Group Blend Modes
The third group of blend modes all have stronger effects as the blend color becomes lighter. They’re basically the inverse of the previous group of blend modes. And for all of the blend modes in this group, pixels that are black are just hidden. Screen blend mode is like Multiply, except that it’s multiplying the inverse of the blend and the base color.
Fourth Group Blend Modes
All right, this fourth group of blend modes, they all add contrast to an image. Because they lighten colors that are brighter than 50% gray, and they darken colors that are darker than 50% gray. So we can see as I move through them for all of the blend modes in this group, pixels that are 50% gray will disappear. Overlay as well as the Soft Light, are commonly used to apply textures when compositing images together in order to help blend edges.
In the fifth group of blend modes, we have Difference, and Exclusion, and Subtract, and Divide. Well they all have scientific as well as creative applications.
Sixth Group Blend Modes
The sixth group of blend modes blend the Hue, Saturation, Color and Luminosity.
- Hue keeps the hue of the blend layer.
- Saturation keeps the saturation from the blend layer, but not the hue or the color.
- Color preserves the gray levels from the base layer, but it keeps the hue and saturation of the blend layer. It’s actually really useful for achieving a hand color or tinted effect.
- Luminosity is the inverse of the color mode. So only the luminance values are affected, and this blend mode can really help to suppress color shifts when making large adjustments using the levels and curves adjustment layers.
I can also cycle through the blend modes using a keyboard shortcut, as long as you have the Move Tools selected or any tool that doesn’t have a blend mode option for the tool in the Options bar, hold down the Shift key and
- Use the plus key to go down through the different blend modes
- Use the minus key to come back up through the different blend modes.