There are several ways that you can straightening an image in Photoshop. First we will discuss how to use crop tool to straighten the image. Next we will go through the application of ruler tool for image straightening.
Using Crop Tool
- Select the crop tool, by tapping the C key
- Choose the straighten option in the options bar.
- Drag the tool over the straight, horizontal, or vertical in an image
- Release the mouse in order to straighten.
You’ll notice that the straighten tool is constrained to within the original canvas so no transparent areas are added.
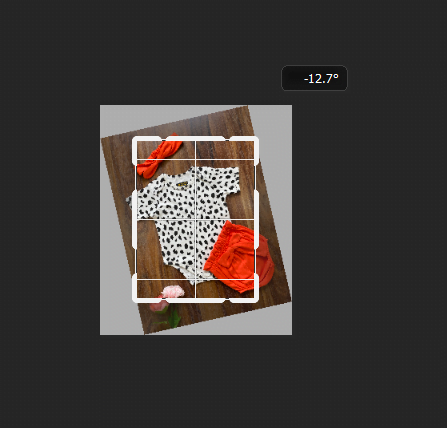
Second method also uses the crop tool. We can just position our cursor outside of the crop marquee and then just drag to straighten the image. You’ll notice that when we rotate the image like this, we’re also constraining the crop to within the canvas size.
Using Ruler Tool
And the third way is to use the ruler tool. Now the ruler tool is nested with the eyedropper tool and this tool can give us two different results. To straighten the layer
- Tap i key and select the Ruler Tool from the tool group.
- Drag out with the ruler tool and it actually drags out a measurement which we can see in the options bar.
- Click the Straighten Layer button to straighten the layer instead of the entire document.

As we can see in the above image, ruler tools shows the X and Y coordinate of the drawn line on the image on the option bar (top left corner). It also shows the width and height.
And if I wanted to straighten all of the layers or the entire document, then
- Go to Image menu
- Go to Image Rotation and choose Arbitrary.
- Photoshop automatically fills in the last measurement.
- Choose between clockwise and counterclockwise.
- Click okay to straighten, Photoshop will add canvas to incorporate the entire image with transparency along the edges.