Introduction
Image Trace used for converting raster images (JPEG, PNG, PSD etc.) to vector artwork. Using this feature, you can easily base a new drawing on an existing piece of artwork by tracing it. For example, you can convert the image of a pencil sketch you’ve drawn on paper into vector artwork using Image Trace. To open Image Trace Panel, go to Window > Image Trace.

Tracing Preset
At the top of the Image Trace panel is a series of preset buttons that offer generic tracing options. There is also a series of preset options in the Preset menu below the buttons.
- Auto-Color : Creates a posterized image from photo or artwork
- High Color: Creates photorealistic artwork of high fidelity
- Low Color: Creates simplified photorealistic artwork
- Grayscale: Traces the artwork to shades of gray
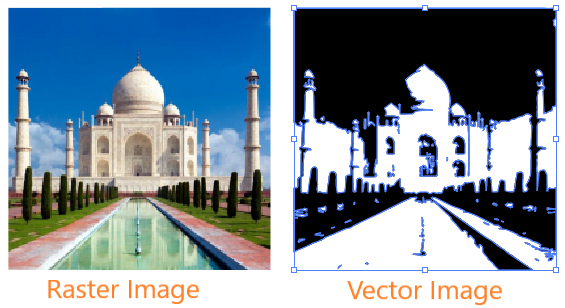
- Black And White: Simplifies the image to black-and-white artwork
- Outline: Simplifies the image to black outlines
View
View menu specifies the view of the traced object. A tracing object is made up of two components: the original source image and the tracing result. Click the eye icon to overlay the selected view over the source image. Various view mode options are

Tracing Image
To trace image follow below steps
- Place a raster image into an Artboard using the File > Place command
- Go to Window > Image Trace to open the Image Trace panel.
- With the Selection tool, select the raster image on the Artboard. After selecting raster content, the Image Trace panel options will no longer be dimmed.
- At the top of the Image Trace panel, click Auto Color button to trace the image using the default settings.
Below figure shows an example of Black and White Image trace.

To remove the tracing from raster image, choosing Object > Image Trace > Release.
Convert to Path
To edit the vector content of an Image Tracing object, expand the tracing results and turn the Image Tracing object into a group of vector objects. Follow below steps for converting
- Select the tracing result.
- To convert the tracing result to paths, do one of the following:
- Click Expand in the Control panel or the Properties panel.
- Choose Object > Image Trace > Expand.
- The resulting paths are grouped together. To ungroup the grouped paths, go to Object > Ungroup.
- To simplify paths by removing excess anchor points, choose Object > Path > Simplify.
Below image shows an example of converting raster image to paths.