Introduction
Transitions are important element of any piece of creative work. Engaging someone throughout its entirety requires you to elegantly weave ideas into a cohesive narrative. Slow motion and Fast motion can be an effective way to show artistic impact to viewer.
Changing Speed and Duration
To change speed and/or duration of clip using Clip menu
- Select one or multiple clips in Timeline Panel or Project Panel
- Do one of the following
- Go to Clip > Speed/Duration
- Right-click and choose Speed/Duration from the context menu.
- Change clip speed and/or duration.

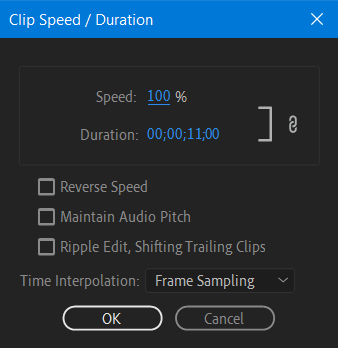
Setting to modify clip are
- If you set a clip to play at 50% speed, it will play back at half speed.
- Duration and Speed linked together i.e. chain icon between them. Changing speed, update the duration and vice versa. Click chain icon to disable the linking.
- Shortening a clip will leave a gap. To avoid this select Ripple Edit, Shifting Trailing Clips option. This option will enable the clip to make space for itself.
- To play a clip backward, select the Reverse Speed option. You’ll see a negative symbol next to the new speed displayed in the sequence.
- To keep the clip’s original pitch at the new speed, selecting the Maintain Audio Pitch check box. With this option disabled, the pitch will naturally go up or down.
Using Rate Stretch Tool
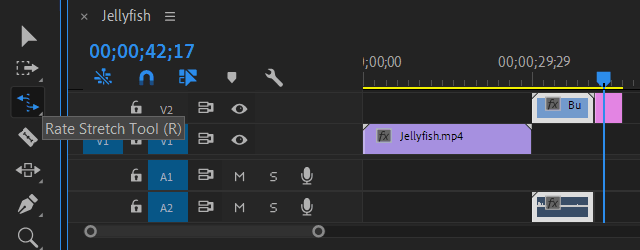
Rate Stretch tool adjusts clip’s duration by altering the clip’s speed so the entire clip fits within the desired duration. To use this tool to speed up one of your clips, follow below steps
- Select the Rate Stretch tool in the Tools panel.
- Shorten clip by dragging either edge of it in toward the middle of the clip. It will speed up the clip.
- Increase the clip duration by dragging either edge outward. The speed of the clip changes to fill the space into which you stretched it.

Using Time Remapping tool
Time remapping uses keyframes to vary the speed of a clip. This means one portion of a clip could play in slow motion while another portion of the same clip plays in fast motion. To use this tool to speed up one of your clips, follow below steps
- Open a sequence on the Timeline.
- Increase height of the video track by positioning the Selection tool over the split between tracks. Drag up/down to make more room to see the video tracks.
- Right-click the clip, and choose Show Clip Keyframes > Time Remapping > Speed. White line across the clip represents the playback speed.
- Press and hold the Control (Command) key as you hover your mouse over the white line. Click the white line to create a keyframe, visible at the top of the clip.
- Position the Selection tool over the white line between the keyframes. To increase the speed of your clip, drag the line up toward the top.

To remove a time-remapping select the clip and view the Effect Controls panel. Click the disclosure triangle next to the Time Remapping effect to open it. Click the toggle animation button (stopwatch) next to the word Speed. This sets it to the off position.
