DSLRs generally share a wide range of features and functions and sometimes even have similar button layouts. With that in mind, the diagrams below are simply meant to represent a generic DSLR.
DSLR Front Diagram
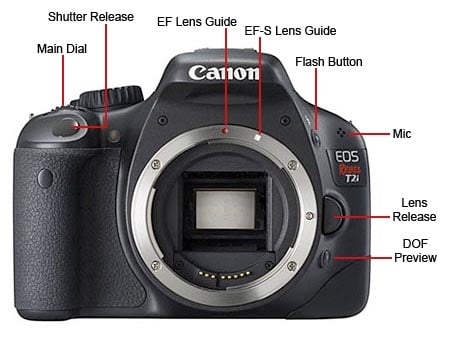
- Shutter Release Button : Press the shutter button halfway to initiate focus and metering. Press completely to take the shot.
- Red eye reduction/Self timer : If red eye reduction is enabled, halfway pressing of shutter button will light up this lamp when built-in flash is enabled. When timer is set, this lamp will blink for the duration of the timer until picture is taken.
- Lens Mount : Connect interchangeable lens to the camera body.
- Lens Mount Index : Align the mark on the lens with this mark when attaching lens to the camera body.
- Lens Release Button : Press this button for detaching the lens.
- Mirror – Reflects the light from the lens to the viewfinder, allows you to see through the viewfinder the image you will be capturing.
- Microphone : Capture the audio during movie recording.
- Depth of Field Preview Button – Press this to get an idea of what your final image will look like at the chosen aperture.
DSLR Rear Diagram

- Viewfinder : Used to compose photo and establish focus on the subject.
- Menu Button : Used for adjusting different camera function.
- Play Button : Displays images saved to the memory card.
- Access Lamp : Blinks when there is data transmission between camera and memory card.
- Focus Point Selector/Zoom Button : Use this button to go to AF point selection mode during AF shooting.
- Live View/ Movie Shooting Switch : Use this button to turn off the live view function. This is also used to switch to movie recording mode.
- Diopter Adjustment : Adjust the clarity of viewfinder image to compensate for imperfections in your eyesight, making it easier to use the camera without glasses.
- Exposure Lock/Zoom Button
- Delete Button : Deletes selected images from the memory card.
- LCD Screen : Displays menus and images, as well as acting as the “live view” screen for cameras with that feature.
- DISP button : Turn the display ‘ON’ and ‘OFF’. Performs other contextual function.
DSLR Top Diagram
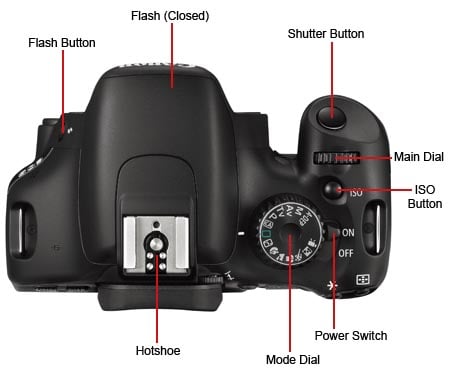
- Drive/ISO : Change drive mode and ISO settings.
- Shutter Button
- Main Dial : Generally used to change shutter speeds or aperture settings, it can also change various other menu items and settings.
- Metering/Exposure Compensation : Change metering mode and apply exposure compensation.
- Hotshoe : Used to connect an off-camera flash.
- Mode Dial : Used to select the shooting modes discussed below.
Viewfinder Display

- AF Point : Indicates the position of the focus during AF shooting. Selected AF points will be highlighted in red.
- Shutter speed
- Aperture value
- ISO Speed
Quick Setting Mode

- Shooting mode
- Shutter speed
- Battery remaining
- Shots remaining
- Image recording format
- ISO speed
- Aperture value
Shooting modes
- A-DEP(Automatic Depth of Field) : A-DEP must be used with AF turned on, as the camera will use the AF sensor array to search through the frame for the distance of all subjects, then determine aperture and shutter values to create a depth of field that will keep all subjects in focus.
- Av (Aperture Priority Auto-Exposure) : Allows the user to choose aperture values, and camera automatically determine shutter speed for correct exposure. Av mode is designed to let the user control depth of field in a shot (to customize deep of shallow focus).
- Tv (Shutter Priority Auto-Exposure) : Allows the user to choose the shutter speed, camera automatically determine aperture values for correct exposure. In this mode, the user determines shutter speed, and the camera will automatically determine an aperture value for correct exposure. Tv mode is designed for applications such as sports photography, where depth of field is not particularly important, but fast shutter speeds to minimize motion blur are desired.
- P (Program Auto-Exposure) : Allows the camera to control both the shutter speed and the aperture value. In P mode, the user may change the shutter / aperture combination. When the user changes the shutter / aperture setting like this, the camera will maintain the correct exposure by adjusting the other one accordingly. This mode is good for shooting in rapidly changing environments, or learning how the combination of shutter and aperture change both exposure and visual elements within the picture.
- CA (Creative Auto) : This mode operates exactly like full automatic mode with several more user controlled options allowed. In CA mode, the user may turn the flash on or off, change exposure compensation, choose picture styles, and change the drive mode of the camera. All other values are locked to camera-control.
- M (Manual): Offers full control over all features. All exposure settings and picture styles must be changed by the user i.e. you are given full control over the exposure determination, setting both the aperture and shutter speed yourself. This allows for the most creative control over the camera, but also demands an understanding of the camera’s features, and basic principals of photography.
- Portrait – The camera will attempt to provide what it determines is sufficiently shallow depth of field.
- Landscape/Scenic – The camera will use evaluative metering and large depth of field to bring as many elements as possible into focus.
- Sports/Action – The camera will use continuous autofocus, a fast shutter speed, and will allow you to shoot in burst mode.
- Macro/Close-Up – The camera will begin the focusing process at the closest end of the lens’ focal range in an effort to have the subject fill the frame.
- Night – Many cameras handle this mode by decreasing shutter speed and turning on image stabilization if it is available.
Autofocus modes
DSLRs come with a range of autofocus modes, however, for simplicity, the two that are most important to understand are AF-S and AF-C
- AF-S (Autofocus single) : This is best used when taking photos of stationary subjects such as portraits of people, landscapes, buildings etc. When you half-press the shutter, the focus will be acquired and locked on that point for as long as you hold the button down. If you want to change to focus, you need to release the button, recompose and then re-half-press.
- AF-C (Autofocus continuous) : This is best used when taking photos of action or moving subjects such as sports and wildlife. When you half-press the shutter, focus will be acquired and locked on to a given subject. When that subject moves, the focus will adjust with it, refocusing all of the time until the photograph is taken.
- AI Focus : This focus mode seeks to act as a hybrid of single shot (AF -S) and AI servo modes (AF-C). AI focus begins in sing shot mode then, if the subjects starts to move, switches to AI servo mode.
White Balance
- Auto – The default setting. The camera does its best to determine accurate color correction.
- Daylight/Sunny – Tells the camera that the light source is “average” daylight or approximately 5200K.
- Cloudy/Sunset – Warms the bluish colorcast associated with daylight. Has a color temperature of about 6000K.
- Shade/Shadow – Makes the scene even warmer than the cloudy setting, with a color temperature of approximately 7000K.
- Tungsten/Incandescent – Representative of typical indoor lighting (a standard light bulb), this very warm setting has a color temperature of around 3200K.
- Fluorescent – Some cameras will offer several variations within the fluorescent setting, but they generally lean toward “cool whites.”
- Custom – Allows you to dial in a color temperature of your own choosing within a given range (between 2000K and 10000K, for example).
File Size and Types

The settings for resolution/megapixels, which concern the file size of a photo, are presented as large (L), medium (M), small (S1-3) and RAW (the largest setting). The settings for compression are displayed next to each size as icons for smooth or blocky curves: The smooth curve means higher quality, and the blocky curve means lower quality. The quality is defined by the amount of compression that is performed on the photo. Lower quality photos that are highly compressed are smaller in size. This will allow you to store more photos on a memory card. If you are shooting photos only for the Web, it is recommended to shoot at M smooth. Eight megapixels is generally considered more than enough for web photos (in fact it’s a bit large) but still allows flexibility to crop and adjust photos as needed.